1. Selecting shapes
return=>page top
Before shape objects can be manipulated, they must be selected. Two methods
are used for selecting shape. The first one is "click on a shape boundary"
and the second one is "drag the mouse diagonally to enclose the shapes
to be selected".
|
Operation
|
Description
|
|
select a shape
|
To select a straight line, polyline or cubic curve, click on the line or
curve. To select a closed shape, click on the shape's boundary or inside
the shape's boundary.
 : Support function for selecting a shape : Support function for selecting a shape
When you move the mouse to a shape, the shape starts highlighting and when
you move the mouse from the shape, the shape stops highlighting. If the
shape is a grouped shape, all the element shapes starts highlighting. The
highlighting shape can be selected by clicking the mouse button. This function
may be useful for selecting a shape without a mistake in
a complex drawing.
If you want to disable this function, clears a checkmark on the check box
named "highlighting for selection".
 =>Highlighting a shape for selection =>Highlighting a shape for selection
|
|
select shapes by mouse drag
|
Drag the mouse diagonally to enclose the shape objects to be selected.
|
|
display selected shapes
|
The selected shapes are displayed in the following manners.
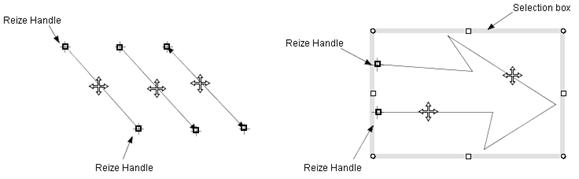
A straight line is displayed with the resize handles at the both ends of
the line (Figure_(a)).
A closed shape is displayed with the gray colored selection box which surrounds
the shape and the resize handles which are located at the corners of the
selection box and the midpoint of each edge of the selection box (Figure
(c), (d)).
A polyline is displayed in the same manner as a closed shape, and if the
polyline is not closed, it is displayed with the resize handles at the
both ends (Figure_(b)).

Figure_(a)
Figure_(b)
Figure_(c)
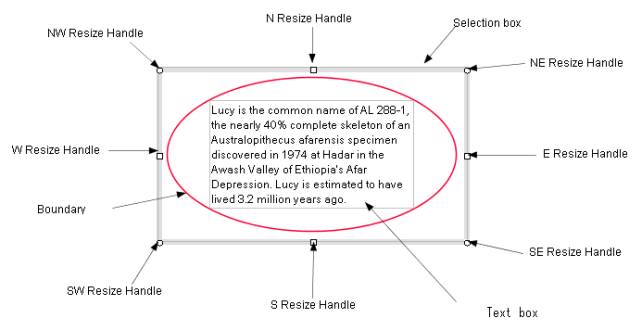
Figure (d) Selection box and resize handles.
|
|
deselect
|
If you click on the place where nothing shape exists, then all selected
shapes will be deselected.
If you click on a shape already selected, the shape will be deselected.
: If you click on a shape already selected and its clicked position is
inside the text box, the text box becomes editable without deselecting
the shape.
|
|
select shapes continuously
|
If you click on a shape with Shift or Ctrl key, you can select it without
deselecting the shape objects already selected.
|
| select one from overlapped shapes |
The best way is clicking on a shape's boundary. |
|
select a text box
|
If you click on the text box inside a shape (including a group). the green
frame is displayed inside the text box and it means that the text box is
editable.
:
If you click on a shape already selected and its clicked position is
inside the text box, the text box becomes editable without deselecting
the shape.
=>
Text box,
Editing text |
:
Highlighting a shape for selection
 return=>page top
Highlighting:Increasing the brightness of the color and the width of the
border of the shape.
 |
|
Normal display
|
Moving the mouse to a line of the grid shape which is a group of lines.
|
Moving the mouse to the polygon.
|
|

|
| Normal display |
Moving the mouse to the border of the string "Seg-0". |
Moving the mouse to the border of ther string "Subpath". |
Moving the mouse to the closed piecewise cubic curve. |
:
Unordinary display of a selection box and resize handles
return=>page top
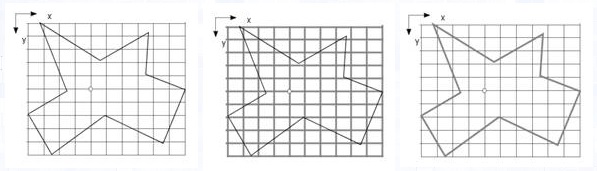
Some properties can be set to a shape using the property tab of the Shape format dialog. Three properties of "unresizable", "keep aspect ratio"
and "keep line direction" affects the display method of a selection
box and resize handles.
(a) Line
 |
|
no property
|
enable resizing: off(*)
|
keep line direction: on
|
|
(*)The small and dark endpoint marks imply that the resize handles are ineffective. |
(b) Open(not closed) shape such as a polyline or piece wise cubic curve
 |
|
no property
|
enable resizing: off
All resize handles on the selection box are invisible
|
keep aspect ratio: on
N, S, E, W resize handles are invisible.
|
(c) Basic shape and closed shape

|
|
no property |
enable resizing: off
All resize handles on the selection box are invisible |
keep aspect ratio: on
N, S, E, W resize handles are invisible. |
:
Cursor mark
return=>page top
The cursor mark changes according to the cursor (mouse) position.
Cursor position
(mouse position) |
Description |
|
Selection box and the resize handle
|
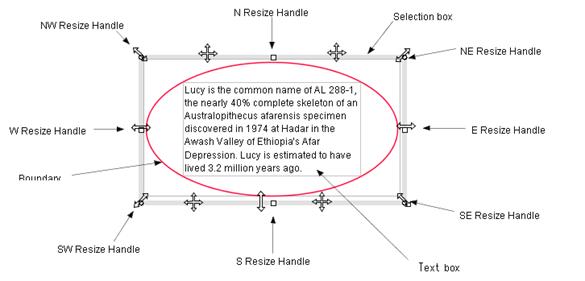
The following cursor mark will be displayed when the mouse is placed on
the selection box or the resize handles.

|
| Endpoint of a line (segment) |
The crosshair cursor will be displayed on the endpoint mark (resize handle)
of a line or a polyline, and the move cursor will be displayed on the line
(segment) or the boundary line/curve.
|
2. Selecting a point on a shape
return=>page top
After clicking on the auto shape button
( )
on the tool bar, and if you move the mouse to a shape's boundary to determine
a dragging start point with the mouse, then the )
on the tool bar, and if you move the mouse to a shape's boundary to determine
a dragging start point with the mouse, then the
 or or
 mark will be displayed. These marks show that the mouse is very closed
to the shape's boundary. Especially the
mark shows that the mouse is nearly on the characteristic points of the
shape's boundary (see Note). The figure below shows such scenes. To create
the line or polyline which connect two shapes, press the mouse button while
the or
mark is displayed and drag the mouse toward another shape's boundary. If
the another mark appears, then release the mouse button.
mark will be displayed. These marks show that the mouse is very closed
to the shape's boundary. Especially the
mark shows that the mouse is nearly on the characteristic points of the
shape's boundary (see Note). The figure below shows such scenes. To create
the line or polyline which connect two shapes, press the mouse button while
the or
mark is displayed and drag the mouse toward another shape's boundary. If
the another mark appears, then release the mouse button.
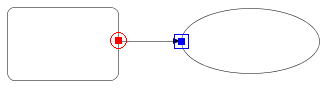
Creating a line connecting two shapes. |
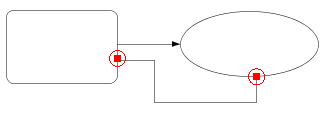
Creating a polyline connecting two shapes. |
:
(1) In the case of resizing a line or polyline, and if you drag one of
the end points of the line or polyline and move the end point to another
shape's boundary, the
or
will be also displayed.
(2) ,
:
A point on a shape's boundary
(connection point)
The
mark is displayed if the mouse is nearly on a characteristic point of
a shape's boundary, and the
mark is displayed if the mouse is placed nearly on a shape's boundary.
Here, a characteristic point is an endpoint of a line/curve segment, or
north, south, east or west point of a closed shape's boundary. So the mark
will be displayed as follows according to the mouse position.
Figure. The examples of the marks to be displayed
(3) Using the function of selecting a shape's point or connection point,
you can create an accurate shape in size, position and connection. =>Examples_Accurate Figures
Simple examples of creating accurate figures
|
Examples
|
Description
|
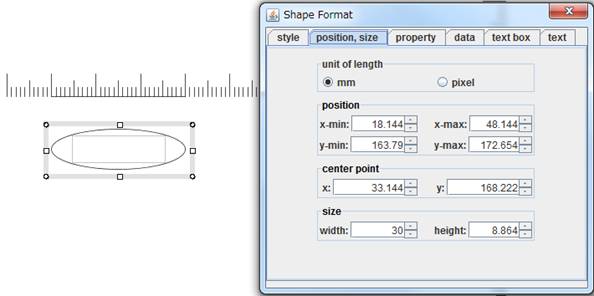
| Accurate shape in size and position |
Example
Step1. Create a line of 30mm using a private ruler.

Step2. Create an ellipse.
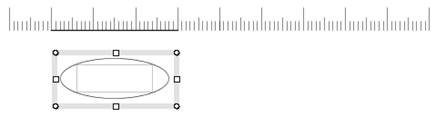
Step3. Resize the ellipse using the
auto_align function.
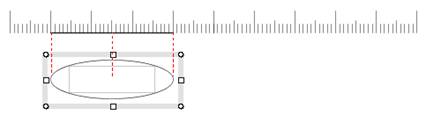
Step4. Check the width of the ellipse using "shape format" dialog.
You can confirm that the width is exactly 30mm.
|
|
connector
|
When you drag the end point of a line or polyline with the mouse and move
the mouse toward a shape's boundary, the
or
mark will be displayed on the shape's boundary. At that time, if you release
the mouse button, then the line or polyline will be connected to the shape
exactly (<10-3 - 10-4 pixel).
=>
connector
|
|
rotation
|
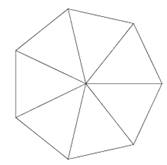
Example Creating a Heptagon
Step1. Creat a line and click on the "click the rotation center"
check box in the rotate dialog. Then move the mouse toward the left end
of the line and click the mouse to specify the new rotation center.
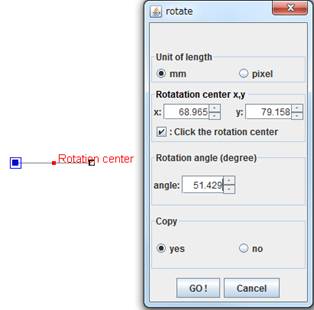
Step2. Press the "Go !" button six times, then you will get the
radial lines..
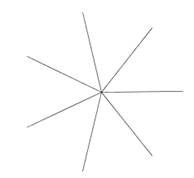
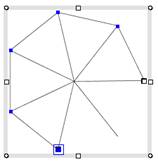
Step3. Move the mouse to each end point of the radial lines and click the
mouse to define segment junction points of the polyline. Then you can get an accurate
heptagon.
 |
 |
 |
| Define the segment junction points |
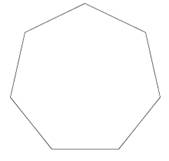
Finished |
Rotate the heptagon
by 90 degree. |
=>
rotate
|
|
translate
|
If you set an accurate translation amount, click on the "click two
points" check box on the "translate" dialog and click two
points on the shape boundary.
=>translate
|
|
 Home
Home